Cameras
The company (or companies) named "Toko" made many cameras over the years. But there may be or more likely there have been more than one Toko camera company at various points in time. One Toko camera company made a wide variety of subminiature cameras. The same company - or perhaps a different one - made several medium format cameras. The same company - or perhaps still another one - made various large format cameras. Few people have heard of any of them and the name is often confused with Toyo, Tojo, etc. Some of the large format Toko cameras are marked with the model name and/or serial number, but some are not marked in any way. The earliest models are probably the ones that are most likely to be unmarked or unlabeled. Most of the cameras were available in Cherrywood (the lightest and least expensive wood), but they were also available in Rosewood (slightly heavier and more expensive), or Ebony (even heavier and even more expensive), as well as special order woods (which, of course, are even more expensive). Some, and perhaps all, of Toko's 4x5 cameras were made by Nagaoka -- a well-known 4x5 camera manufacturer. We know this because some of the later Toko FL-451 and FL-452 4x5 cameras have a plate on the bottom saying "Manufactured by Nagaoka". Perhaps Nagaoka bought Toko at some point or perhaps Toko had Nagaoka make some of their later cameras. Nagaoka 4x5 cameras typically have aluminum metal parts whereas Toko cameras use more attractive brass parts. I do not know if any Toko cameras are still being made. In any event, they are difficult to find on the used market, but typically they sell for much less than similar, better known 4x5 cameras -- even though they are probably less full-featured. The website www.toko.com does not list any photographic gear.
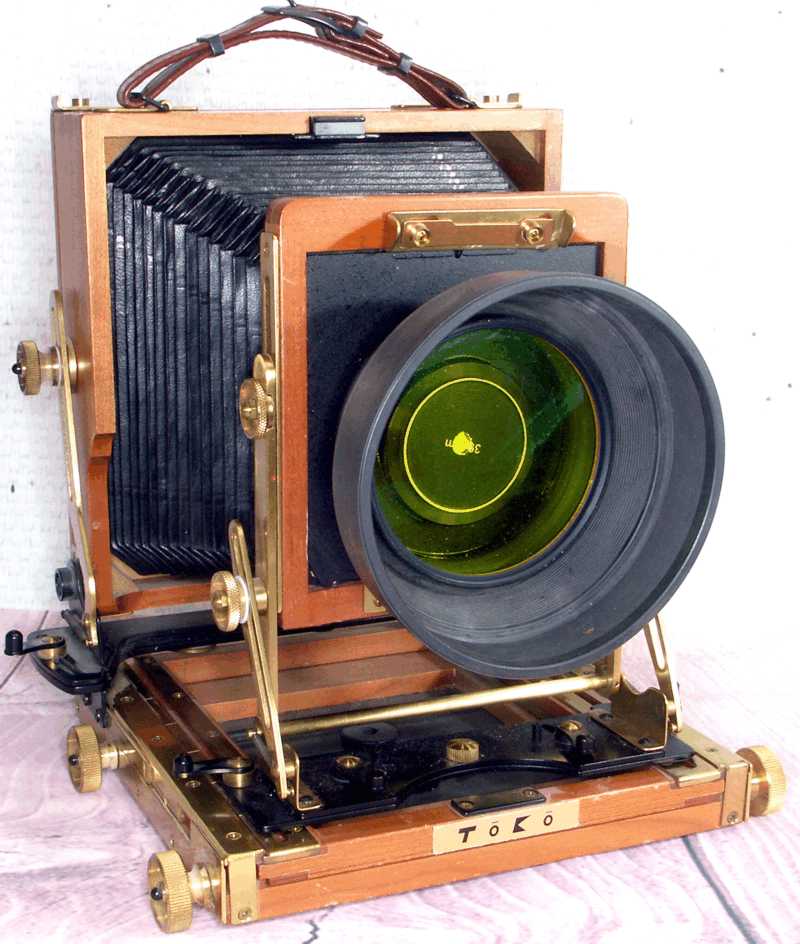
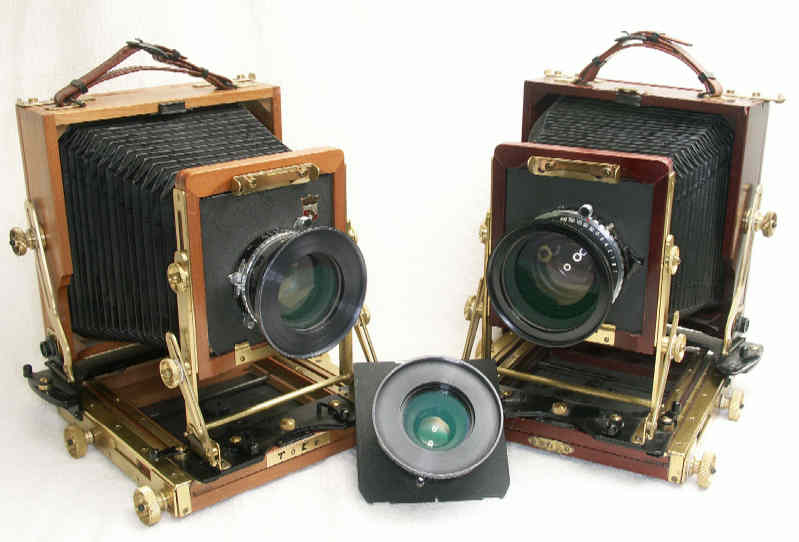
Toko Nikki II
My Toko Nikki II is in beautiful rosewood with a Beattie Intenscreen and extra fresnel lens for even better viewing. Here it is with a 125mm Fujinon NW f5.6 lens.
The Toko Nikki II was my first 4x5, purchased in 1985. I still have it. The 1985 Buyer's Guide from Popular Photography lists a Nikki I, a Nikki II and a Nikki III. The Nikki I was the same as the Nikki II, but it lacked the back focus movement of the Nikki II, so it was less expensive and extends only to 12 inches (300mm). I have never seen or heard of a Nikki III, so I doubt that there ever was one. Maybe it was on the drawing board, but I don't know what features could have been added to the Nikki II - maybe front shifts or rear rise?
The Toko Nikki II adds rear focus to the Nikki I so you can
extend the back out (60mm) or move it forward (50mm). This allows you to
set the total bellows extension anywhere from 65mm to 360mm (14 inches).
It also lets you use super-wide-angle lenses - even without a recessed lensboard
and without having to drop the camera bed -- as well as using longer focal
lenses such as 300mm and 360mm lenses - and even 400mm telephoto lenses.
With a recessed lensboard you are even able to use extra-super-wide-angle
lenses such as the 47mm Schneider XL (see below) and with extension cones
you can use 600mm lenses (see below).
Both cameras have substantial rise and fall on the front standard (75mm up
or down) as well as left and right swings (20 degrees left and right) and
backward and forward tilts (90 degrees forward and 20 degrees back). Neither
has shift on the front standard. On the rear standard both have left and
right shift (20mm left and right) and left and right swings (12 degrees left
and right) and backward and forward tilts (28 degrees backward and 20 degrees
forward). There is no rise and fall on the rear standard.
The front standard took Wista or Linhof type lensboards but the shutter hole was purposely placed off-center (a little lower than dead center). The rear standard was a standard, universal spring back accepting 4x5 sheet film holders, Polaroid film packs and holders, 6x7 and 6x9 roll film holders, and even 5x7 film with an adapter back.
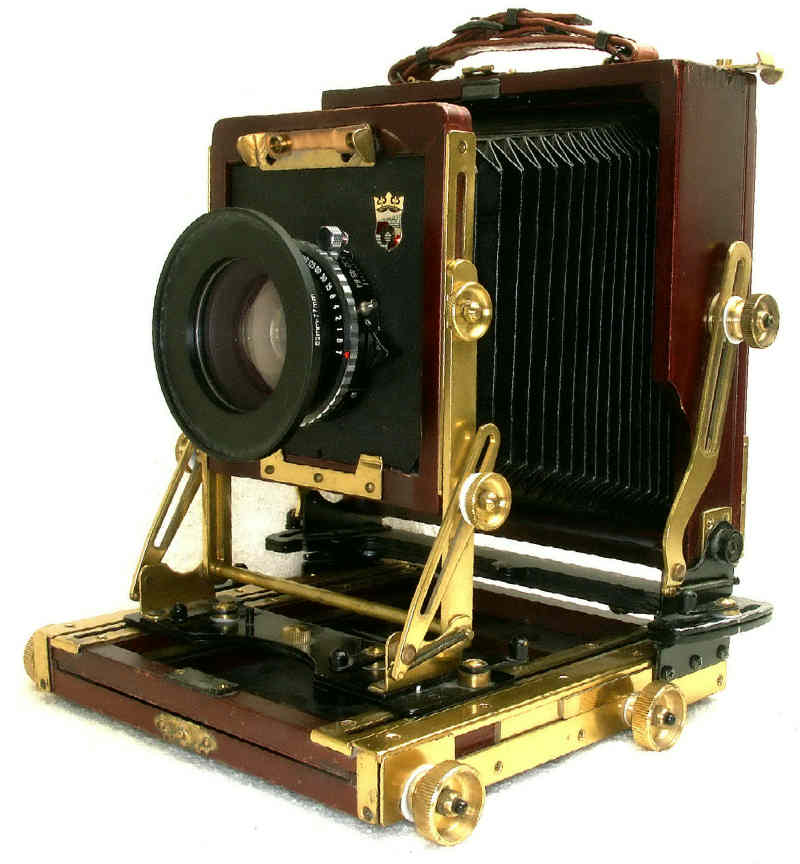
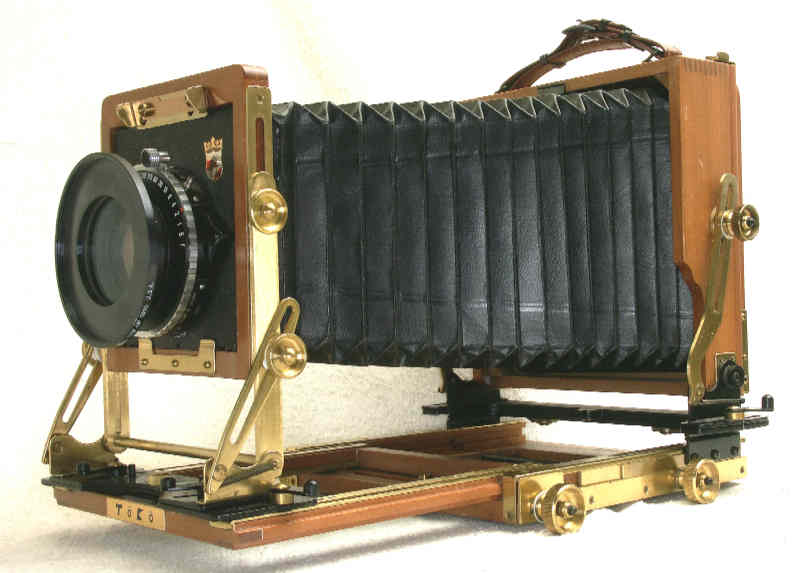
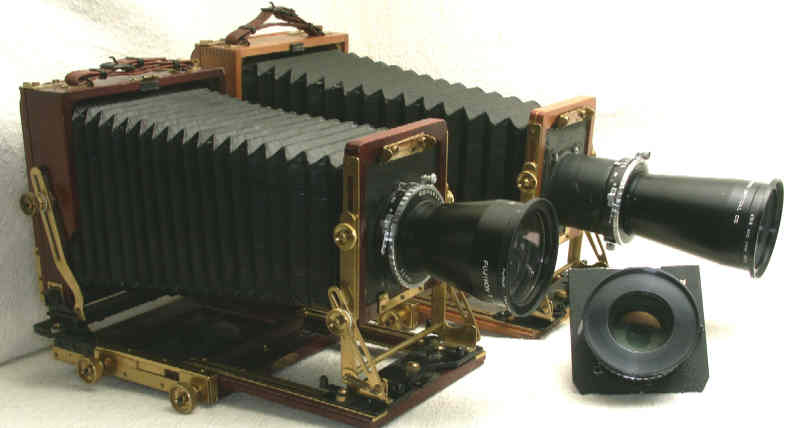
Toko FL-452
My Toko FL-452 is in beautiful cherrywood with a Beattie
Intenscreen and extra fresnel lens for even better viewing. Here it
is with a 300mm Fujinon C f8.5 lens.
The Toko FL-452 is almost identical to the Nikki II. They also made a FL-451 which was the same as the FL-452, but it lacked the back focus movement of the FL-452, so it was less expensive and extends only to 12 inches (300mm). They never made a FL-453, which confirms my belief that there never was a Nikki III either. The Nikki cameras had a small clip on the top to keep the camera body closed when collapsed, but this was removed on the FL cameras to keep the clip from accidentally scratching the top of the bellows.
Like the Toko Nikki II, the Toko FL-452 adds rear focus to the FL-451 so you can extend the back out (60mm) or move it forward (50mm). This allows you to set the total bellows extension anywhere from 65mm to 360mm (14 inches). It also lets you use super-wide-angle lenses - even without a recessed lensboard and without dropping the camera bed -- as well as using longer focal lenses such as 300mm and 360mm lenses - and even 400mm telephoto lenses. With a recessed lensboard you are even able to use extra-super-wide-angle lenses such as the 47mm Schneider XL (see below) and with extension cones you can use 600mm lenses (see below).
Both the Toko FL-452 and the FL-451 have substantial rise and fall on the front standard (75mm up or down) as well as left and right swings (20 degrees left and right) and backward and forward tilts (90 degrees forward and 20 degrees back). Neither has shift on the front standard. On the rear standard both have left and right shift (20mm left and right) and left and right swings (12 degrees left and right) and backward and forward tilts (28 degrees backward and 20 degrees forward). There is no rise and fall on the rear standard.
The front standard took Wista or Linhof type lensboards but the shutter hole was off-center (a little lower than dead center). The rear standard was a standard spring back accepting 4x5 sheet film holders, Polaroid film packs and holders, 6x7 and 6x9 roll film holders, and even 5x7 film with an adapter back.
Lenses
"Normal" lenses
Wide-Angle lenses
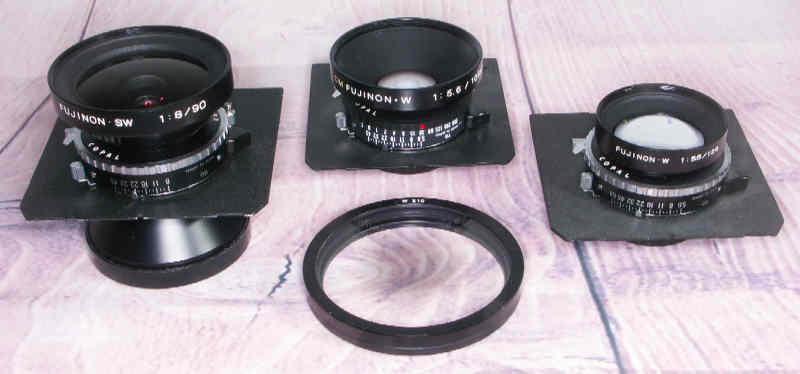
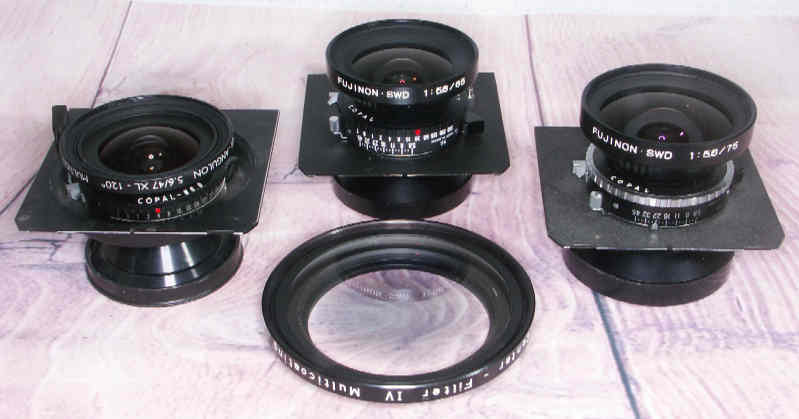
Super Wide-Angle lenses
Long Focal Length lenses
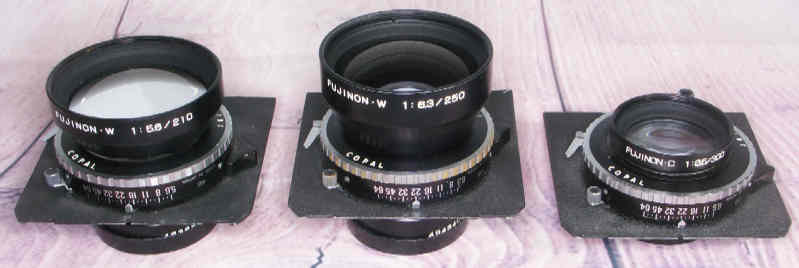
Telephoto lenses
Fisheye
lens
Moving right along, REAL fisheye lenses come in two "formats". The first
are full-frame fisheyes which cover the entire film format. The others are
circular fisheyes which create a circular image on the film. Actually, the
full-frame fisheyes are really circular fisheyes but the image is so large
that only the central portion falls on the film. Most full-frame fisheyes
have lens shades on them to cut out extraneous light. But if you remove the
lens shade you can use these lenses on larger format cameras as circular
fisheyes. I once used this approach with the Minolta 16mm MC Rokkor f2.8
full-frame fisheye for their 35mm cameras. By removing the lens shade, I
was able to use it on a 120 film holder -- as a circular fisheye. Of course
I had to create an adapter, but it worked great until it was stolen.
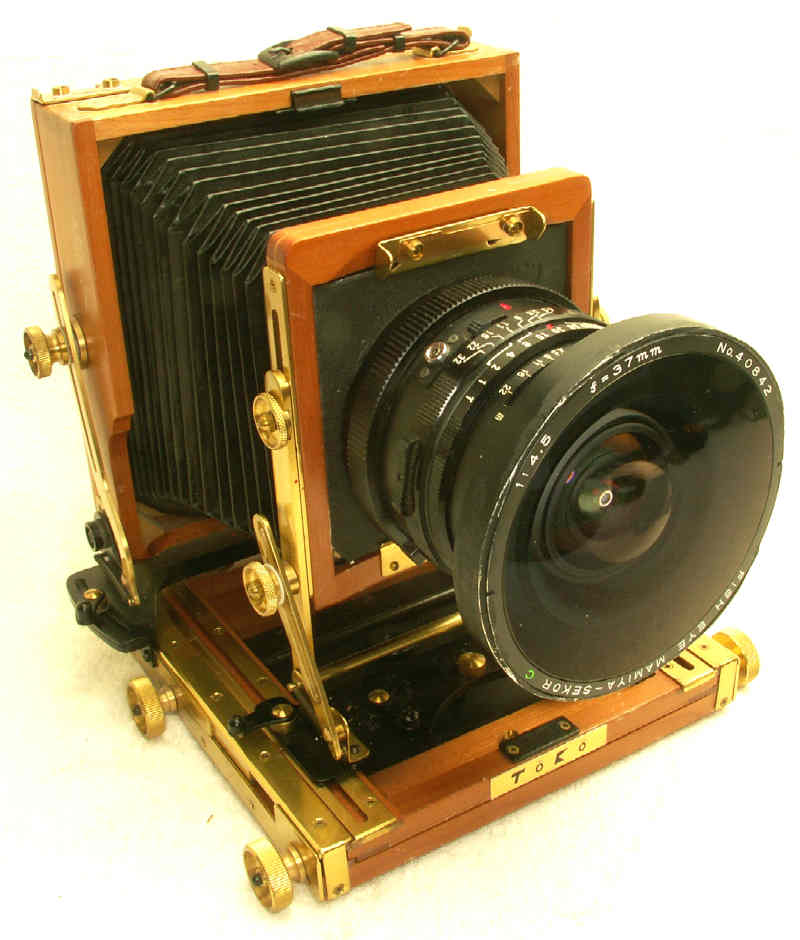
Since I wanted a fisheye lens on my 4x5 cameras, and no one that I know
of, makes that I decided to become creative. I looked at various medium format
cameras, but most did not make fisheyes, and those that did had the shutter
in the camera. I needed one with the shutter in the lens. The 37mm fisheye
for the Mamiya RB cameras came to mind. This is very large (three by four
inches) and very heavy (almost three pounds), you have to figure out a way
to attach it to a lensboard, but the results are superb. It is multi-coated
and has nine elements in six groups. On the rear you can put on 40.5mm filters.
I got step up rings to 77mm - my standard - so I can put any type of filter
on the fisheye.
I discovered that the rear of the Mamiya 37mm fits almost perfectly over
the light shield ring on the Wista lensboard. I epoxied the lens to a 77mm
filter ring and then epoxied the filter ring to the front of the lensboard.
I then covered the seams with black silicone sealant. I, of course,
had to first drill out the lensboard to the width of the filter ring. Then
I cut off the short, built-in lens shade on the front of the lens. The only
"problem" for me is that the fisheye is now centered on the lensboard while
all of my other lenses are slightly off-center as they should be (about 10mm
lower than center). That's not really a problem though because the Toko Nikki
II and the Toko FL-452 allow for up to 75mm drop on the front standard. I
just drop the front standard 10mm when the fisheye is used to get the image
in the center of the film -- easy to see on the ground glass. The f4.5 aperture
of the Mamiya lens makes the image very bright and clear. The circular image,
when focused at infinity, almost reaches to the edge of the film frame, so
if I do close-ups with this lens, the image will be too big to get a full
circular image on the film. You can get a full-frame image, at any distance,
simply by cropping on the darkroom easel. This lens is equivalent
to an 8mm lens with a 35mm format.
Here is an short article that I wrote about the details with several pictures.
It is in ADOBE format so you will need some software that can read
it. It is at
www.subclub.org/fujinon/gonefishin.pdf.
Macro and Micro lenses
Due to the limit of my bellows -- 360mm -- I can only get to 1X (life-size)
with my 180mm Fujinon, so I revert to shorter focal length lenses (below)
-- which don't have a typical, large format, threaded-shutter lens mount.
So I use an Agfa Polaroid Prontor shutter in combination with my short
focal length macro/micro lenses. The Prontor shutter has a common,
#1 (40mm) front thread, but it lacks an aperture -- something that most large
format shutters incorporate. This means two things. First, it's
much thinner than most large format shutters, and just as important, it's
much less complicated and less expensive. These can easily be found
for under $20 in excellent condition -- without a lens, of course. The
lack of an aperture is not an obstacle at all because all of my macro/micro
lenses have apertures. The Prontor shutter has speeds from 1 second
to 1/125, plus B -- and a PC flash connection, so it is perfect for close-up
work. The most unusual feature of the shutter is that it has TWO cable
release connections. The first operates the shutter for the speeds
from 1 second to 1/125 -- and it is a very convenient, auto-cocking shutter.
The shutter is normally closed, and is opened by a press on the shutter
release -- and when it closes, it is immediately ready for another exposure.
No cocking is needed. The second shutter release has two purposes.
Pressing a cable release in this connection opens the shutter -- until
it is released. This allows for viewing, composition, and depth-of-field
examination. And if a locking cable release is used, time exposures
of any length are easy.
Soft-focus gear
I have three methods for making soft-focus images. Each of them creates very different soft-focus pictures -- and in different ways.
#1 -- Soft focus filters:
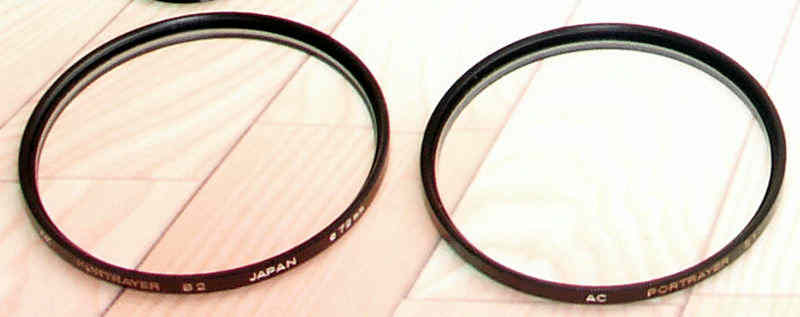
The soft-focus filters I use are Minolta Portrayer Type S filters.
Minolta made lots of filters, and their soft-focus filters are called "Portrayer" filters. These are unlike any other soft-focus filters -- which typically just simply diffuse the image overall -- to a greater or lesser extent. Minolta's approach was to use wave-optics -- using a special compound to coat glass in precise patterns and thicknesses. They came in two styles and two sizes -- 55mm and 72mm. They are multi-coated and have no effect on the exposure. Their Portrayer P filters are designed for portraiture, and soften the skin tones, but little else. They came in three strengths -- mild, medium, and strong. Their Portrayer S filters are designed for scenics, and diffuse the subject while preserving overall sharpness. They came in two strengths -- mild, medium. A strong effect can be achieved by using both together. You can see the effect either by looking through the filter, or better still, looking through the lens -- as the effect increases with the focal length. The effect is not influenced by the f-stop being used. I have the two 72mm Portrayer S filters -- which I can use on any of my large format lenses from 37mm fisheye to 600mm with step up & down rings. While I don't use them with my 12.5mm and 25mm micro lenses, I can use them on the enlarger if I want to.
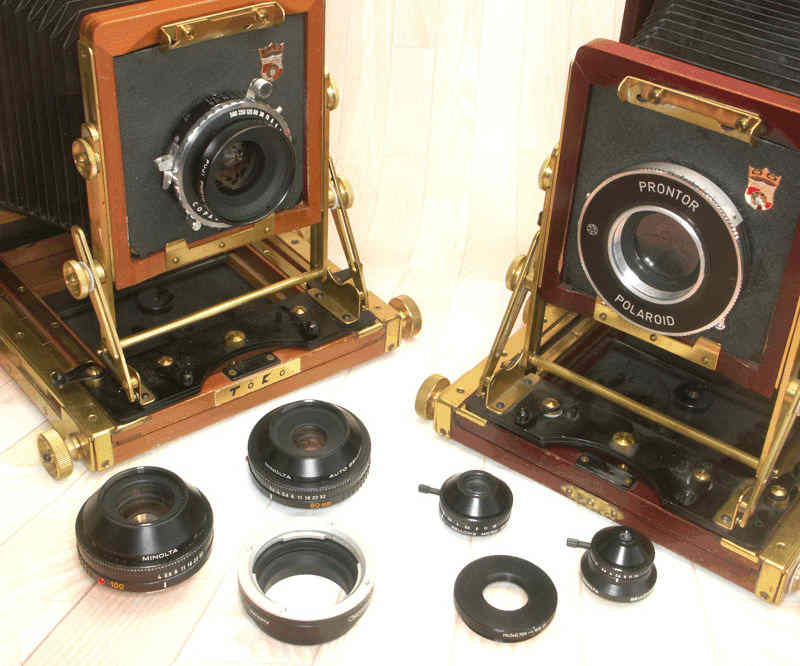
#2 -- Supplementary lenses (AKA Close-up filters):
The Portrayer filters soften the image overall, from center to edge, but to attain a more tapered softening of the image -- meaning sharper in the center and more diffuse toward the edges -- I switch to close-up filters, but I use these WITHOUT a lens on the camera.
Since close-up lenses have a focal length of their own, they can be attached to many cameras -- all by themselves -- to create wonderful pictures with a romantic, pictorial, soft-focus effect. Since close-up lenses are usually either simple one- or two-element lenses (there are a very few three and four element versions!), the result is a very soft image, especially at the edges -- much like the three element Fujinon SF series of lenses (they made a 180mm, 250mm and 420mm) or the two element Rodenstock Imagon series of lenses (they made a 200mm, 250mm and 300mm). And just like the Fujinon SF and Imagon lenses, the soft effect from close-up lenses can be varied by adjusting the f-stop on the shutter -- and the change can be seen on the ground glass. Stopped down, lower diopter filters produce surprisingly sharp results, while high diopter lenses produce extremely soft images with wide apertures.
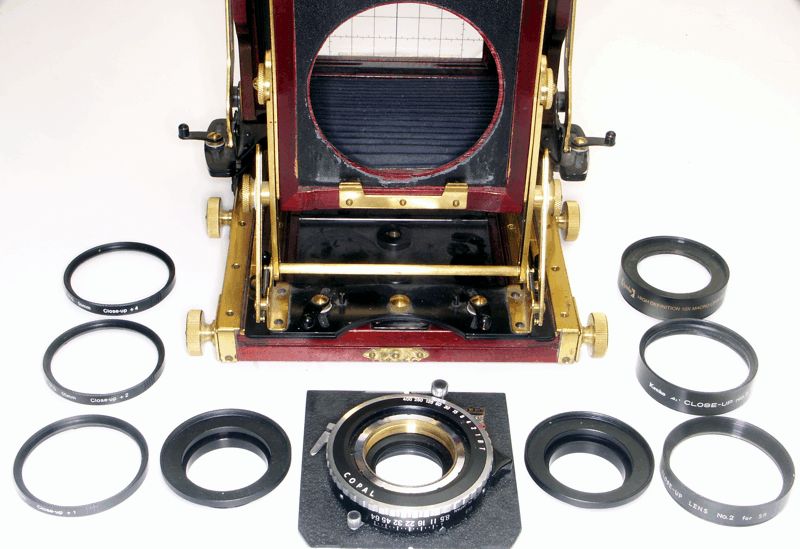
I use adapters (step-up rings) on the front and rear of a Copal #1 shutter to create Verito-type lenses of various focal lensgths -- from 75mm to 360mm.

From left to right are 55mm single-element close-up lenses (for the front of the shutter), a 55mm to rear Copal #1 adapter, a Copal #1 shutter, a 55mm to front Copal #1 adapter, and 55mm double-element close-up lenses (for the rear of the shutter). These lenses are coated, but that's not very important in soft-focus work -- neither is the use of a lens shade.
#3 -- Pinholes:
For even more dramatic soft-focus effect, I pull out my pinholes.
Pinholes "lenses" are a little trickier to use than your typical lens, but they are well worth the effort. First of all, they are really not lenses at all, nor are they made by any major manufacturers. They are merely tiny, "needle" holes in paper, plastic or metal, that you can buy or make yourself. They have great depth of field due to their tiny fixed apertures, but the edges of the image are very fuzzy/blurry. The best pinholes are laser pinholes in small, thin metal sheets. Because the holes are "cut" by a laser it has a very clean edge -- but these are also the most expensive. They don't usually come with a "focal length" designation. You are simply told the diameter of the hole. You use that to determine the focal length -- using a formula -- which is the point where the image will be the "sharpest". Then, knowing the focal length of the pinhole, and the diameter of the pinhole, you can calculate the f-stop.
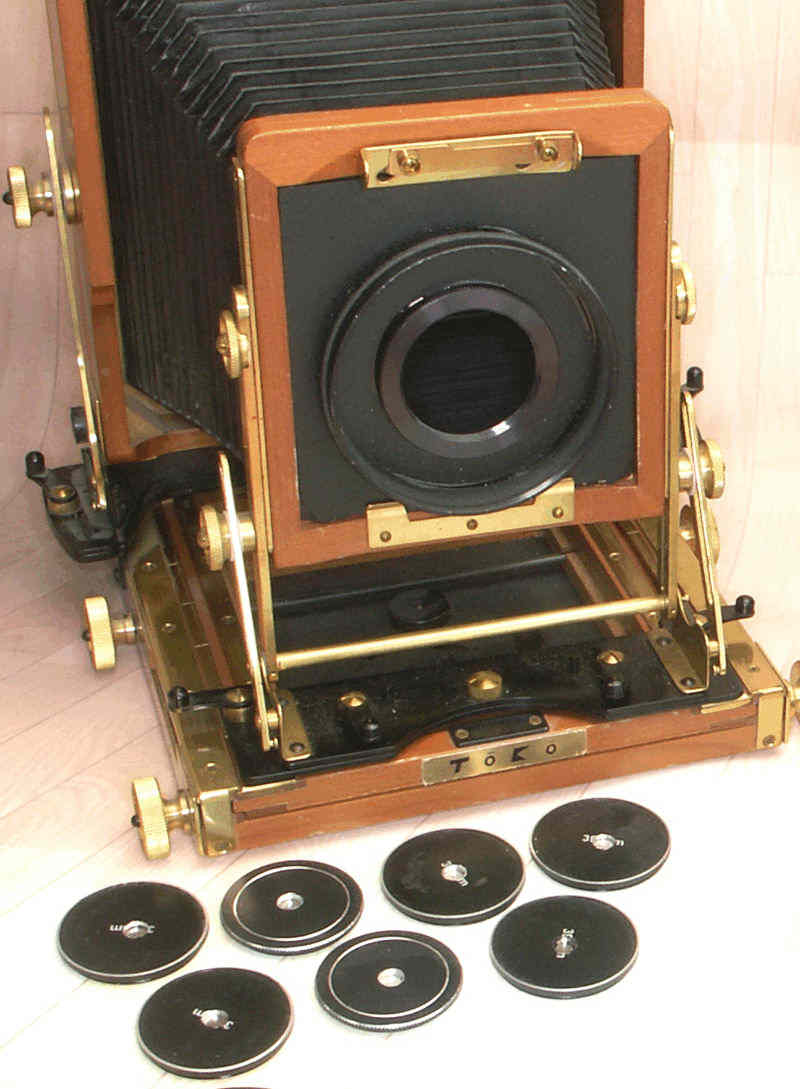
My laser-cut, in aluminum, pinholes were chosen based on the shortest
and longest extension of my camera's bellows. They are:
For my pinholes, I use 39mm (AKA, Leica) thread, metal lens caps (below). First, I drilled 1/4 inch holes in the middle of the lens caps, and then taped pinhole to the rear of the lens cap so that the pinhole is in the middle of the 1/4 inch hole in the lens cap.
I attach the pinholes to the camera by screwing them into a Leica-thread enlarging lens locking ring epoxied to an off-set #1 lensboard -- below. I don't need a shutter because the exposures are so long, even with fast film, all I need is a watch. A lens cap works fine to start and stop the exposure.
I also expoxied a 77mm filter ring around the Leica-thread enlarging lens locking ring because I like to use typical, "contrast", colored filters, such as 25A (Red), O2 (Orange), etc. for B&W film. But I can also use graduated filters, polarizers, even center neutral density filters to counteract, to some extent, the extreme light fall-off of pinholes. And a lens shade can't hurt -- I guess!