DETERMINATION OF OPTIMUM PAPER EXPOSURE
There is no universal paper exposure time. It varies according to the
type of enlarger you use (condenser, diffuser, cold light, point light, etc.),
the amount of flare that your enlarger lens produces, the amount of flare
that your enlarger light-system produces, the print magnification, the type
of paper you are using, the density of the negative, and many other factors.
If you use the exposure times that someone else recommends, you are
probably not getting the best results that you can since their situation
is not exactly the same as yours. Little differences in these factors can
lead to big differences in your results.
1. Select any combination of film and paper to test. The tests must be re-run
if you change film, paper, developer, enlarger, enlarger lens, toner, special
techniques, etc. There are a lot of things that can affect the outcome
of these tests, so it's best to be as rigorously consistent as possible.
2. Find the shortest exposure time that produces maximum black on the paper.
Exposure times shorter than this would mean that your pictures are
not as rich in the dark areas as they could be. Exposure times longer
than this would mean that you are losing brightness in the highlight areas
of your prints or using too low a film speed -- or both. This test
needs to be rerun for each enlarger lens that you have.
-
A. Set the enlarger at the standard height used for the earlier tests.
-
B. Select the best lens for the film size being used.
-
C. Focus the lens with a scrap negative. Then remove the scrap negative.
-
D. Stop-down the lens two f-stops.
-
E. Use no filters for B&W; for color, use the paper manufacturer's
recommendation.
-
F. Turn the lights off. The safelights can be turned on as determined
in earlier tests.
-
G. Place a sheet of the photographic paper in the easel.
-
H. Cover 1/2 of the paper with an opaque card.
-
I. On the uncovered half of the paper, make a test strip from one second
to two minutes. For example, 1, 2, 4, 8, 15, 30, 60 and 120 seconds.
-
J. Now cover the test strip side of the paper and uncover the unexposed side.
Open the lens 2 f-stops and expose the unexposed side of the paper
for two minutes. Make sure that the exposures on the two sides overlap
-- if they don't, you'll end up with a with a white streak down the middle
of the page.
-
K. Develop, fix, wash and dry the paper according to the results from the
previous tests.
-
L. The side of the paper that received the 2 minute exposure should be at
maximum black. If you are not sure that maximum black has been achieved
in this section, you can increase the exposure to whatever is appropriate.
The goal is to find the shortest exposure time which produces maximum
black in the test strip. Compare the test strip side of the paper to the
other side of the paper -- maximum black. Find the shortest test strip
time that shows a tone equal to maximum black. It's a good idea to
re-run the test to fine-tune the time. For example, if 60 seconds produces
maximum black but 30 seconds does not, you can run another step strip between
30 to 60 seconds.
-
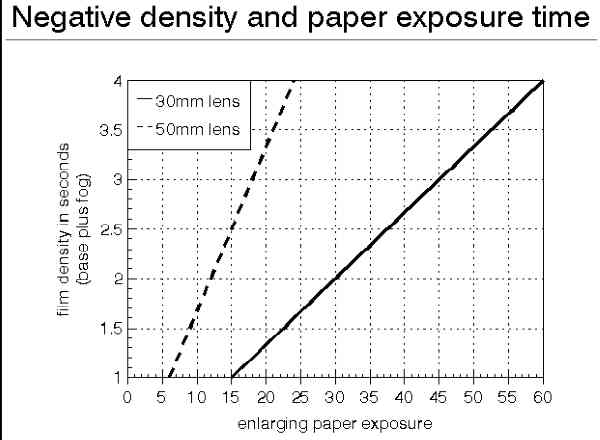
M. Note the time on a graph for future use as follows:
-
1. Use graph paper or a computer graphics program to create a graph showing
exposure time on the left and negative density on the bottom. Exposure
should run from 0 to 50 seconds and density should run from 0 to 0.6.
-
2. At the point of zero negative density, place a dot for the exposure time
you just determined in Step L. Since we did not have a negative in
the enlarger during the test exposure we used a negative with zero density.
For example, let's say that we used a 50mm lens and determined that maximum
black was first reashed at 10 seconds. Plot that on the graph.
-
3. Next, place a dot at the 0.3 density point by doubling the exposure from
Step #2. In our example, we placed a dot at Density 0.3 and Time 20.
-
4. Last, place a dot at the 0.6 density point by doubling the exposure from
Step #3. In our example, we placed a dot at Density 0.6 and Time 40.
-
5. You will refer back to this graph everytime you use a new film or a new
developing time. It tells you what exposure to use for all negatives
of a given density. All you need to know is the density of the negative,
and we will cover that next.
Now that you know how to correctly expose the paper, you're ready to move
on to DETERMINATION OF OPTIMUM FILM DENSITY.
3. In step #2, you determined the best exposure for this type of
film/paper/developing combination. But there are times when you will
need to change the exposure of the paper. First, is artistic licensce.
Perhaps you prefer the scene to be slightly darker than it really was.
In this instance, you'll need to change the exposure according to your
preferences. Secondly, if the negative was incorrectly exposed or
developed, a change in the exposure of the paper can help. It will
not save the day completely, and how much to over- or under-expose the paper
depends on how badly over- or under-exposed/developed the film was. The
only other time that you will need to change the exposure of the paper is
if the magnification of the print is changed. Most darkroom workers
determine changes in exposure with the use of test strips -- a waste of time,
paper and chemicals. With the formula below, you can skip this step.
-
A. Start with the enlarger at the base settings as used above.
-
B. Note the magnification of the image. This is the short side of the
total image (in inches or millimeters) which should be around 8 inches.
This is NOT just the part of the image on the easel. If the image
is wider than the easel, measure the entire side of the image.
-
C. For future exposures with this type of negative and processing, proceed
as follows:
-
1. Place a new negative in the enlarger.
-
2. Set the enlarger to the desired height.
-
4. Focus the image on the easel.
-
5. Turn on the enlarger.
-
6. Re-measure the magnification on the short side of the total image
(not just the easel).
-
7. Compute the new exposure time with this formula:
NEW TIME = ((NEW MAG + 1) * (NEW MAG + 1)) * BASE TIME
(BASE MAGNIFICATION + 1) * (BASE MAGNIFICATION
+ 1)
For example, if the old magnification was 8 (inches), the old time was 10
seconds, and the new magnification is16 (inches), the new time is 35.7 seconds.
You might think that the new exposure should be 40 seconds -- since
a 16x20 print is four times the size of an 8x10 print. But 35.7 --
you can round up to 36 -- will be a little more accurate.
-
8. Change the f-stop, if needed, to avoid reciprocity rule failure with a
long exposure time.
-
9 Add in color filters or variable contrast filters, as needed, and compensate
accordingly
If you have any ideas, suggestions or comments about these pages, please
contact the Sub Club at the FRONT DESK.
To return to the main index for the Sub Club click
here.
COPYRIGHT @ 1995, 1996, 1997, 1998, 1999, 2000, 2001, 2002, 2003, 2004, 2005 by Joe McGloin. All Rights Reserved.