
THE CREATIVE CORNER
I'd like to pass on a bit of info I've discovered while working on Minox enlarging. Some of you may remember that I got a Raptar 25mm lens, and have tested that and found that it worked quite well for enlarging Minox negatives in conjunction with a Beseler 4X5 enlarger using a Minox sized carrier. There are quite a few drawbacks to the setup however. First, focusing with the Beseler is quiet a challenge, due to the very small movements necessary, and the coarseness of the Beseler focusing "rack and pinion". Even using a very sophisticated grain focuser, I found it very difficult to achieve repeatable accurate totally sharp focus. Next, the lens needs to be stopped down a bit for maximum performance. Even at 5X7" prints, this moves the exposure times into the minute range rather than the seconds range that I am accustomed to. I'm also not to satisfied with the great big Beseler neg carrier, as it needed a bit of machine work to thin out the carrier so that the edges of the projected image were not vignetting the projected image. It's also very difficult to position the image in the carrier compared to the Minox III enlarger setup. But I do get the advantage of colorhead, diffusion enlarging which are not available on the Minox enlarger. This solution was not giving me what I wanted, and began to explore alternatives.
The Minox III enlarger has a very nice "modular" lens, negative stage and condenser component. If one loosens the tension on the negative clamping lever, the whole assembly can slide out of the enlarger by pulling the lens unit forward. This gives one access to the condenser (it removes by pressing and rotating the condenser), and to the negative masks. It also makes it possible to use carefully cut VC filters above the negative for printing B&W prints, something I've been doing for quite some time.
The "big idea" finally came to me while looking at this assembly. What I was holding was basically an "enla head" for a Minox negative. All I needed was to make a fixture which would allow the Minox lens module to accurately attach to a Beseler lens board. Luckily, my motorcycle connections came to the rescue, and I was able to describe to my machinist motorcycle mentor enough of my quest so that with considerable R&D, a suitable fixture was created. The creation of this fixture entails fitting an extension tube to the Beseler lens board (to space the assembly to clear the Beseler lens pivot, and to create a mating surface for the top of the Minox condenser), and then make a stand off with a cam lever clamp which will allow you to position and clamp the negative. Once this is done, you can use the Minox assembly (with no modification to the Minox unit, so you can still put the whole plot back in your Minox III enlarger!) as an "enla head".
The benefits are: bigger enlarging compared to a 25mm lens (I haven't found a shorter non Minox enlarging lens), bigger aperture (Minox lens is always 3.5) for shorter exposure, ability to use colorhead and big VC filters, vastly improved focusing due to the Minox focusing mount, and much easier positioning of the negatives while printing. Due to the use of condenser and diffusers in the system, I call it a "confuser" head....
Here are some pictures and descriptive information.
Here is the clamping lever mechanism. It pushes on this top spring, and forces
the upper and lower pieces together, thus holding the negative in place.
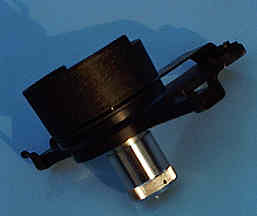
Here is the Minox III condenser, neg stage, and lens. No modification is
necessary on this component. This picture is just for identification. Note
spring strap on top of the actual lensboard. Pressure on this strap by the
clamp forces the two components, upper and lower into contact with the negative.
By pressing down on the condenser and turning, the condenser will release,
and allow cleaning of the lens, and access to the negative carriers. One
can now make a full frame carrier if you wish, by very carefully filing out
the hole in the two carrier components.
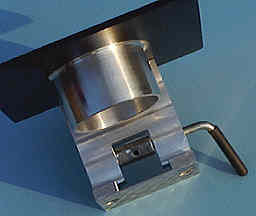
Here is the fixture, without the Minox component in place, mounted to standard
Beseler lens board. Note clamping lever, rotation causes cam on lever to
compress the upper, condenser component against the lower lensboard component.
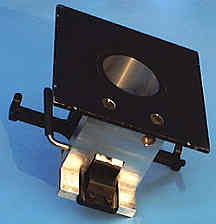
Here is a rear view of the fixture with the Minox component in place. Note
the two attaching screws that hold the fixture to the lensboard.
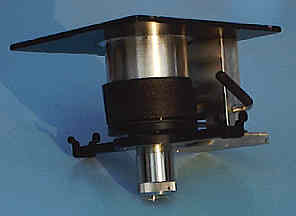
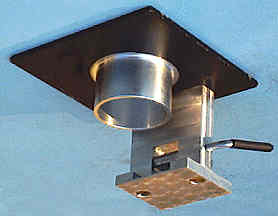
Here is the complete assembly. This is now ready to use. I cover the gap
between the upper silver tube and the top of the condenser with heavy gage
tinfoil, thus trapping all the light to the inside of the lens tube.
Those with Beseler 4X5 condenser head enlargers can use the resistrol to control the amount of light coming through the lens, those using a colorhead of course can use neutral density to control the amount of light in either case, having too much light is not likely to be a big issue.
For more information about these enlarger heads, please contact pete@pixelpete.com.

To return to the main index for the Sub Club click here.
COPYRIGHT @ 1995, 1996, 1997, 1998, 1999, 2000, 2001, 2002, 2003, 2004, 2005 by Joe McGloin. All Rights Reserved.