Creating soft-focus lenses
from supplementary (AKA auxiliary or close-up) lenses (AKA filters)
There is an unexpected way to use close-up lenses on large format cameras -- which doesn't necessarily have anything to do with close-up photography! Since close-up lenses have a focal length of their own, they can be attached to many cameras -- all by themselves -- to create wonderful pictures with a romantic, pictorial, soft-focus effect. Since close-up lenses are usually either simple one- or two-element lenses (there are a few three and four element versions!), the result is a very soft image, especially at the edges -- much like the three-element Fujinon SF series of lenses (they made a 180mm, 250mm and 420mm), the two-element Rodenstock Imagon series of lenses (they made a 120mm, 150mm, 200mm, 250mm, 300mm, 360mm, 420mm, and 480mm), or the three-element, Soft-Focus Congo (they made a 200mm) or the Komuranon-SF 300mm f5.6. And just like the Fujinon SF, Rodenstock Imagon, Congo, and Komuranon Soft-Focus lenses, the soft effect from close-up lenses can be varied by adjusting the f-stop -- assuming it is placed on a shutter with an adjustable diaphragm.
But first, you might want to delve more deeply into the history, practice and aesthetic of the soft-focus lens in photography. If so, here is a link to "THE SOFT-FOCUS LENS AND ANGLO-AMERICAN PICTORIALISM" by William Russell Young, III -- A Thesis Submitted for the Degree of PhD at the University of St. Andrews in 2008.
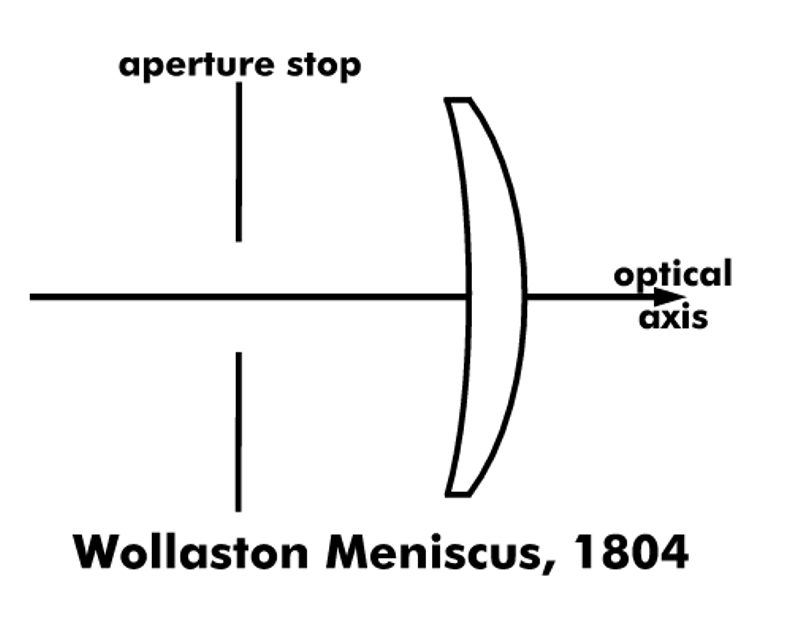
Around 1800 -- many years before the first photograph was even created -- William Hyde Wollaston developed what he called the Wollaston Landscape lens It was used by artists with camera obscuras. It was simply a single-element, meniscus lens -- just like a close-up lens -- with the concave side (rear) of the lens pointed toward the subject, and a variable aperture between the subject and the lens. It was the first reasonably sharp lens -- when stopped down -- that covered a relatively wide field -- about 45° . The focal length of the lens was dependent on the diopter of the lens (see below).
It's very easy to create a Wollaston Landscape lens today, simply by attaching a single-element close-up lens of your choice on the back of a large format shutter -- and, as mentioned, the soft effect from the close-up lens can be varied by adjusting the f-stop -- assuming it is placed on a shutter with an adjustable diaphragm. All that is needed is an adapter to attach the close-up lens to the rear side of the shutter -- just an appropriately-sized step-up ring or two.
While these lenses are functional, the main drawback of the Wollaston Landscape lens is that it must be used stopped down to achieve acceptable results. Of course, if very soft results are the goal, then this is not an obstacle, but most photographers preferred to operate at wider apertures. It took about a hundred years, but a solution was finally found -- a way to achieve usable, soft results at wider apertures -- the Wollensack Verito Portrait lens.
Similar in many ways to the Wollaston Landscape lens, the Wollensack Verito Portrait lens used a single meniscus lens in front of the shutter -- this time pointed toward the subject -- and a doublet optic on the rear, pointed toward the film.

And just like with the Wollaston Landscape lens, it's very easy to create a Wollensack Portrait lens, simply by attaching a single-element close-up lens of your choice on the front of a large format shutter and attaching a double-element close-up lens of your choice on the rear of a large format shutter -- and, as mentioned, the soft effect from the close-up lenses can be varied by adjusting the f-stop -- assuming it is placed on a shutter with an adjustable diaphragm. All that is needed are adapters to attach the close-up lenses to the front and and rear sides of the shutter -- simply a few step-up rings.
Just to be clear, although the Wollaston lens was originally called a Landscape lens, and the Wollensack lens was originally called a Portrait lens, either lens can be used for any purpose -- whether landscape, portraiture, or whatever. That's completely up to you, as is which lens design, the focal length of the lens, and the degrees of softness -- controlled by the aperture.
Here's all you need:
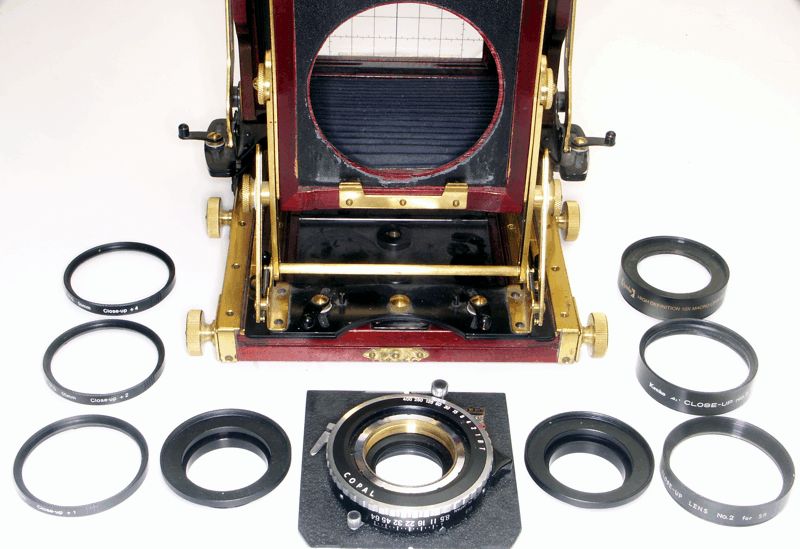
On the left are several single-element, meniscus, close-up lenses -- in this case, 55mm #1, #2, and #4 diopter single-coated lenses. These can be used alone, or in combination, on the rear of the shutter -- as a Wollaston Landscape lens -- or on the front of the shutter combined with a doublet on the rear of the shutter -- as a Wollensack Portrait lens.
Continuing left-to-right in the photo is an adapter -- step-up rings -- to attach 55mm filters to the front of a #1 shutter.
In the middle is a #1 Copal shutter -- without any lens elements attached.
To the right of that is an adapter -- step-up rings -- to attach 55mm filters to the rear of a #1 shutter.
Last, on the right, are several double-element, close-up lenses -- in this case, 55mm #3.8, #5, and #10 diopter, coated lenses. These can be used alone, or in combination, on the rear of the shutter -- with a single-element, meniscus, close-up lens on the front of the shutter -- as a Wollensack Portrait lens.
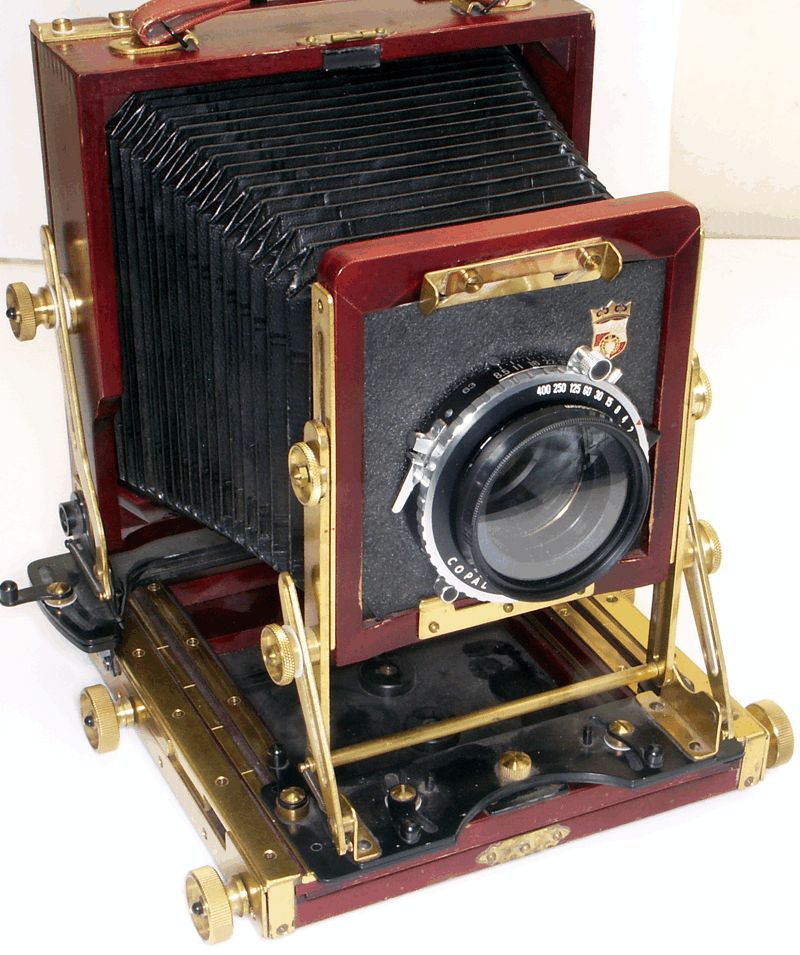
Here's what a home-made, DIY, Wollensack Portrait lens looks like -- very much like a real Verito lens!
Single-element close-up lenses will give the greatest softness effect, especially with higher diopter numbers, when used wide-open, and toward the edges of the image, while lenses with lower diopters, or more elements will give less chromatic and spherical aberration -- or if stopped down. The choice is up to you.
While you don't need to use a lens shade, using one will reduce flare and glare. Again, that it up to you.
You might be completely surprised by the quality of the images that you can obtain -- especially with lower power, achromatic or apochromatic diopter lenses, when stopped down -- and/or with B&W film. You just might decide that the more expensive achromatic and apochromatic close-up lenses, even at higher diopters and even wide open, produce images that are too sharp for your needs!
You can compute the focal length of your Wollaston or Verito lens by dividing 1000 by the sum of the diopters -- for example, a #1 diopter lens on the front and a #4 diopter lens on the rear = 5 diopter. 1000 / 5 = a 200mm lens.
You can compute the maximum f-stop of the lens by dividing the focal length of the optic by the widest diameter of the shutter's aperture.
As the diopter of the close-up lens(s) increases, the focal length and f-stop decrease. Since the flange focal lengths of the close-up lenses will be the same as the optical focal length, you need to keep in mind the minimum and maximum bellows extension of your camera(s). Here is a summary of what can be achieved singly or with various combinations of close-up lenses and shutters. Please note that these are the MAXIMUM f-stops based on the width of the shutters. You can always stop down for exposure control or to achieve more depth of field -- or sharper images -- and don't forget about Neutral Density filters:
|
Shutter |
Copal #0 |
Copal #1 |
Copal #3 |
||
|
Diopter |
Optical and Flange Focal Length |
f-stop |
f-stop |
f-stop |
|
|
1 |
1000mm |
41.7 |
33.3 |
22.2 |
|
|
2 |
500mm |
20.8 |
16.7 |
11.1 |
|
|
3 |
333mm |
13.9 |
11.1 |
7.4 |
|
|
4 |
250mm |
10.4 |
8.3 |
5.6 |
|
|
5 |
200mm |
8.3 |
6.7 |
4.4 |
|
|
6 |
167mm |
6.9 |
5.6 |
3.7 |
|
|
7 |
143mm |
6.0 |
4.8 |
3.2 |
|
|
8 |
125mm |
5.2 |
4.2 |
2.8 |
|
|
9 |
111mm |
4.6 |
3.7 |
2.5 |
|
|
10 |
100mm |
4.2 |
3.3 |
2.2 |
|
|
11 |
91mm |
3.8 |
3.0 |
2.0 |
|
|
12 |
83mm |
3.5 |
2.8 |
1.9 |
|
|
13 |
77mm |
3.2 |
2.6 |
1.7 |
|
|
14 |
71mm |
3.0 |
2.4 |
1.6 |
|
|
15 |
67mm |
2.8 |
2.2 |
1.5 |
|
|
16 |
63mm |
2.6 |
2.1 |
1.4 |
|
|
17 |
59mm |
2.5 |
2.0 |
1.3 |
|
|
18 |
56mm |
2.3 |
1.9 |
1.2 |
|
|
19 |
53mm |
2.2 |
1.8 |
1.2 |
|
|
20 |
50mm |
2.1 |
1.7 |
1.1 |
The current crop of Copal shutters have front threads of: #0 -- 29.5mm x 0.50, #1 -- 40.0mm x 0.75, and #3 = 58.0mm x 0.75. The rear threads are: #0 -- 29.5mm x 0.50, #1 -- 36.0mm x 0.75, and #3 = 58.0mm x 0.75. That's quite a difference.
You need to figure out what the maximum aperture of the new "lens" is. There are different ways to do this from trial and error to using a ground glass metering probe. A good starting point is to compute it -- take the focal length, based on the diopter(s), and then divide it by the shutter iris diameter (Copal #0 = 24mm, Copal #1 = 30mm, Copal #3 = 45mm). Don't be surprised if you end up with an f2.0 lens! And, of course, the f-stop numbers on your shutter are now pretty irrelevant, but you can probably use the scale to stop-down incrementally.
Also, with these types of DIY lenses, you need to watch out for "image loss". These lenses have limited angles of coverage and may not fill the format you are using -- at least not at infinity. The only way you will know is to try, but the shorter the focal length (i.e., the stronger the total diopter), the more likely you are to run out of image circle. You also need to watch out for vignetting due to a lens shade, the width and depth of your adapter(s) and shutter-aperture. In some situations you might need to use a wider shutter, a shorter adapter, a wider lens shade -- or a combination of these.
Here are a few websites that have some photographs using some of the techniques mentioned on this page. OK, not all of them are taken with large format cameras, but the methods are the same -- or very similar. Some of these shots were taken with very old, very simple lenses from very old, very broken cameras -- very cheaply, I might add. Websites like these can be hard to find on the web because if you search for "close-up lenses" or "supplementary filters", you undoubtedly end up with tons of macro shots.
https://en.wikipedia.org/wiki/Wollaston_landscape_lens
http://www.lungov.com/wagner/c/093c.html
http://galactinus.net/vilva/retro/eos350d_meniscus.html
https://antiquecameras.net/antiquelenses/softfocuslenses.html
http://galactinus.net/vilva/retro/meniscus_bw.html
http://forum.mflenses.com/meniscus-lenses-t63197,start,30.html
http://www.johnnyoptic.com/tutorial1.cgi
http://forum.mflenses.com/meniscus-lenses-t63197.html
http://tonopahpictures.0catch.com/150Eidy/12inchDarlotLandscape.html
https://diediemustdive.wordpress.com/2016/10/08/adapting-classic-lenses-to-modern-cameras/
https://www.shutterbug.com/content/soft-focus-revisited-digitally-how-make-your-own-soft-focus-lens-one-i%E2%80%99ve-used-40-years
Why pay hundreds of dollars for a Fujinon, Rodenstock or Verito Soft-focus lens when you can get an adjustable alternative for about 1/10th the price?
![]()
OK, we've come a long way, down several paths. It can seem pretty confusing. So here's a summary table that might provide some perspective on the different available approaches. The SKINK options are not listed in this graph but it basically covers the entire area of the gragh from one end to the other:

Here is a great article from Petersen's Photography (1979) by David Brooks about the various ways to get soft-focus results. It has examples for 35mm, medium format and large format:
www.subclub.org/fujinon/softfocuscompressed.pdf
![]()
But I'm not done yet. If you are a "do it yourself" type of guy or gal, you might be interested in some similar approaches that other shutterbugs have devised using with simple, cheap (lots of times FREE) stuff and gotten GREAT results!
Here's a page from the DO IT YOURSELF PHOTOGRAPHY WEBSITE on how to build your own lenses -- from broken cameras, cheap cameras, old cameras, trashed cameras, etc. There are several approches that you can use, some of which are outlined on this page, but their approaches are even cheaper and they have several pictures showing the results. They don't use any large format cameras, but the techniques are the same and with details from this page you can figure out how to get it to work on your camera(s).
And I can't say goodnight before telling you about a great machine shop that either has or can make just about any adapter that you can't make, or prefer not to make, to finish your project.

Contact they by clicking on the above image or just go to http://www.skgrimes.com/products/adapters
![]()