
How to use supplementary (AKA auxiliary
or close-up) lenses (AKA filters)
to quickly expand your lens arsenal
"Supplementary Close-up filters". Talk about a misnomer -- or two, or THREE!
First of all, they are NOT "filters". They are lenses and have a focal length to prove it. Secondly, they CAN be used in close-up photography, but they don't have to be used that way because they have other uses as well. Thirdly, they CAN be used to supplement another lens, but they don't have to. They can function quite well on their own.
Normally, you would never think of using an auxiliary, close-up lens/filter on a large format camera. Why? Because you don't need it. You simply add more bellows extension if you want to focus closer. Another option is to use a lens with a shorter focal length -- if you happen to have one. Still, if your camera has limited bellows extension, or you lack a shorter lens, and you want to get REALLY close -- for example, with a 210mm lens on 300mm of bellows -- these filters will come in handy. However, those details are not be covered here -- just read the instructions that came with your close-up lens(es).
There are a few other, unexpected ways that these close-up lenses can benefit your large format photography.
Most close-up lenses are marked with their diopter number, such as #1, #2, #3, etc. Some use the designations +1, +2, +3, etc. A #1 diopter close-up lens has a focal length of 1000mm (or 1000mm divided by 1), so any lens when focused at infinity will focus at 1000mm (40") when the close-up lens is attached. A #4 diopter close-up lens has a focal length of 250mm (or 1000mm divided by 4), so any lens when focused at infinity will focus at 250mm (10") when the close-up lens is attached.
But some close-up lenses are not marked with standard diopters. Minolta, for example, uses it's own system. Its No. 0 close-up lens has a diopter of 0.94, its No. 1 close-up lens has a diopter of 2.00, and its No. 2 close-up lens has a diopter of 3.80. Minolta also made a close-up lens specifically for it's 100-500mm zoom, but it is not marked with any sort of power designation, but it happens to be a 0.37 diopter lens. Other companies, such as Nikon and Leica, use odd systems as well -- the numeric designation on Leica's close-up lenses actually DECREASES as the diopter strength INCREASES. Go figure!
Close-up lenses can be purchased individually, if you have a particular diopter in mind, or they can be bought in sets. The most common set is a #1, a #2 and a #3 - which gives you diopters from #1 to #6 when used singly or together in various combinations. Combining a #1 with a #3 gives you a #4, for example. Another frequently seen set is a #1, a #2 and a #4 -- since the #1 and #2 can be used together to make a #3. Another set is a #1, a #2, a #4, and a #10. When using close-up lenses, it is best to use as few as possible, and if you are using more than one filter, always put the highest diopter lens on the camera first for the best results. If using other types of filters, such as a polarizer, put them on last.
But not all close-up lenses are created equal. Most are single-element, meniscus lenses that are not coated. They are referred to as "chromatic" (having color) optics with color-fringing -- most noticeably away from the center of the scene and especially on the edges of objects or shadows. Minolta, like some other manufacturers, made higher quality, double-element close-up lenses that are fully coated. These are referred to as Achromatic lenses -- "A" (away from) "chromatic" (having color). Although more expensive, this helps deal with some of the chromatic aberration that occurs, and the coating helps reduce flare. And then there are a few Apochromatic -- "Apo" (not having) -- close-up lenses that have even better correction for chromatic aberration, but these are even MORE expensive. But in any case, it is best to stop-down as much as possible to obtain the greatest edge-to-edge sharpness (assuming that is what you want!). Stopping down is more important the higher the diopter of the close-up lens. And using a lens shade will help as well, to reduce glare -- especially apparent in uncoated lenses. Here is a simplified comparison of how the different types of close-up lenses operate:
If you would like to delve a bit more deeply into the nature of "simple" lenses and optics, I highly recommend reading this well thought-out and well-worded summary before proceeding on this page.
While most people think of close-up lenses strictly for use in close-up photography, they actually have other good uses -- especially if you are using a camera with a bellows. Since the close-up lens shortens the focal length of the lens to which it is attached, it can be used to shorten the focal length of lenses on cameras with flexible bellows. The image will need to be refocused to the distance desired, but with a flexible bellows, focusing to infinity is usually very easy -- even though you are using a close-up lens! The formula and chart below show some of the possibilities with various lenses and close-up lens additions.
COMPUTING ADJUSTED FOCAL LENGTHS
WHEN ADDING SUPPLEMENTARY CLOSE-UP FILTERS/LENSES
Gullstrand's Equation
X = 1000 / ((1000 / Y) + Z)
Where:
Y = the original (or starting) focal length in mm (in green)
Z = the diopter (not the focal length) of the close-up lens to be used (in yellow)
X = the new (or adjusted) focal length in mm (in blue)
Some examples are:
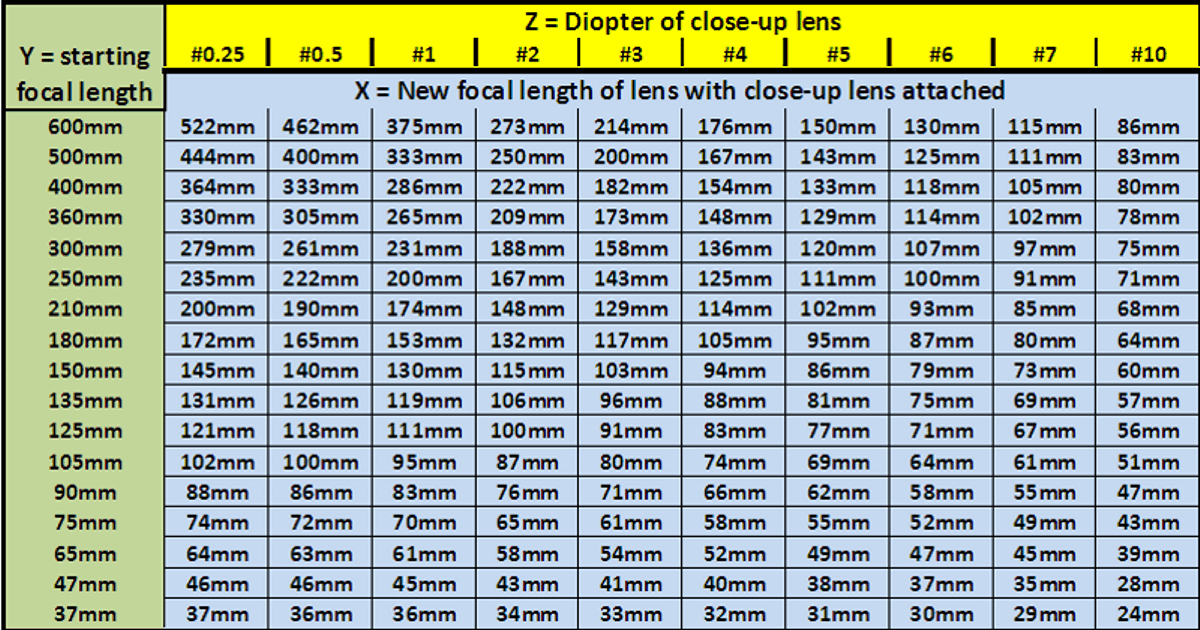
These figures are only approximations because the actual focal length (X) will vary slightly depending on your situation, such as how much distance exists between the prime lens and the close-up lens(es). Using close-up filters in this way gives you much more flexibility in your existing list of lenses. For example, if you only have access to three lenses, adding a couple of close-up lenses will basically put a dozen lenses in your camera bag. But pick the close-up lens or lenses to meet the focal lengths that you will need to use -- until you can afford more lenses. Even if you only buy one close-up lens, it can give you a lot more flexibility for very little money. For example, say you currently have a 300mm (tele), a 150mm (normal), and a 90mm (wide). By adding a single #2 close-up lens, you'll end up a 300mm, a 190mm, a 150mm, a 115mm, a 90mm, and a 75mm. Not bad! Try to get two element optics that are fully coated in order to get the best possible results. This is usually hard to determine, unfortunately. For example, Minolta's close-up lenses are all excellent two-element optics that are fully-coated, but these facts are never mentioned on the box or on the instruction sheet. Here is a website that can sort out some of your options:
http://fuzzcraft.com/achromats.html
And in any event, always use a lens shade, but the lens shade that you normally use with the lens might cause some vignetting due to the shortening of the focal length.
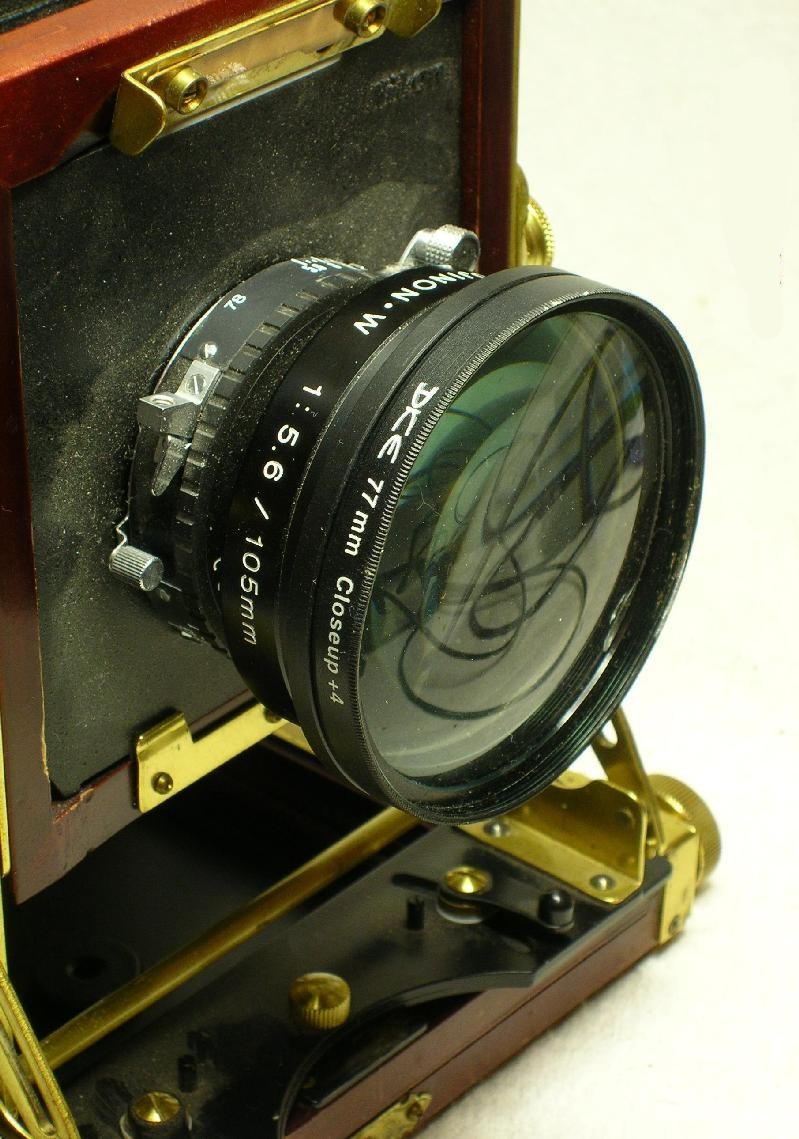
Here is a 77mm #4 close-up lens attached to my Fujinon CM-W 105mm lens. The combination results in a 75mm lens, approximately.
There is no need to adjust the exposure with close-up lenses, but you still need to use them carefully. Make sure the close-up lens is physically wide enough to adequately cover the front of the lens it is placed on. This is especially important with wide-angle lenses. And watch out for vignetting after the close-up lens is attached, especially if you are using more than one close-up lens, additional filters, shifts, tilts, swings, or rise/fall. You may find that a step-up ring to a larger close-up lens size will solve the problem -- should it occur.
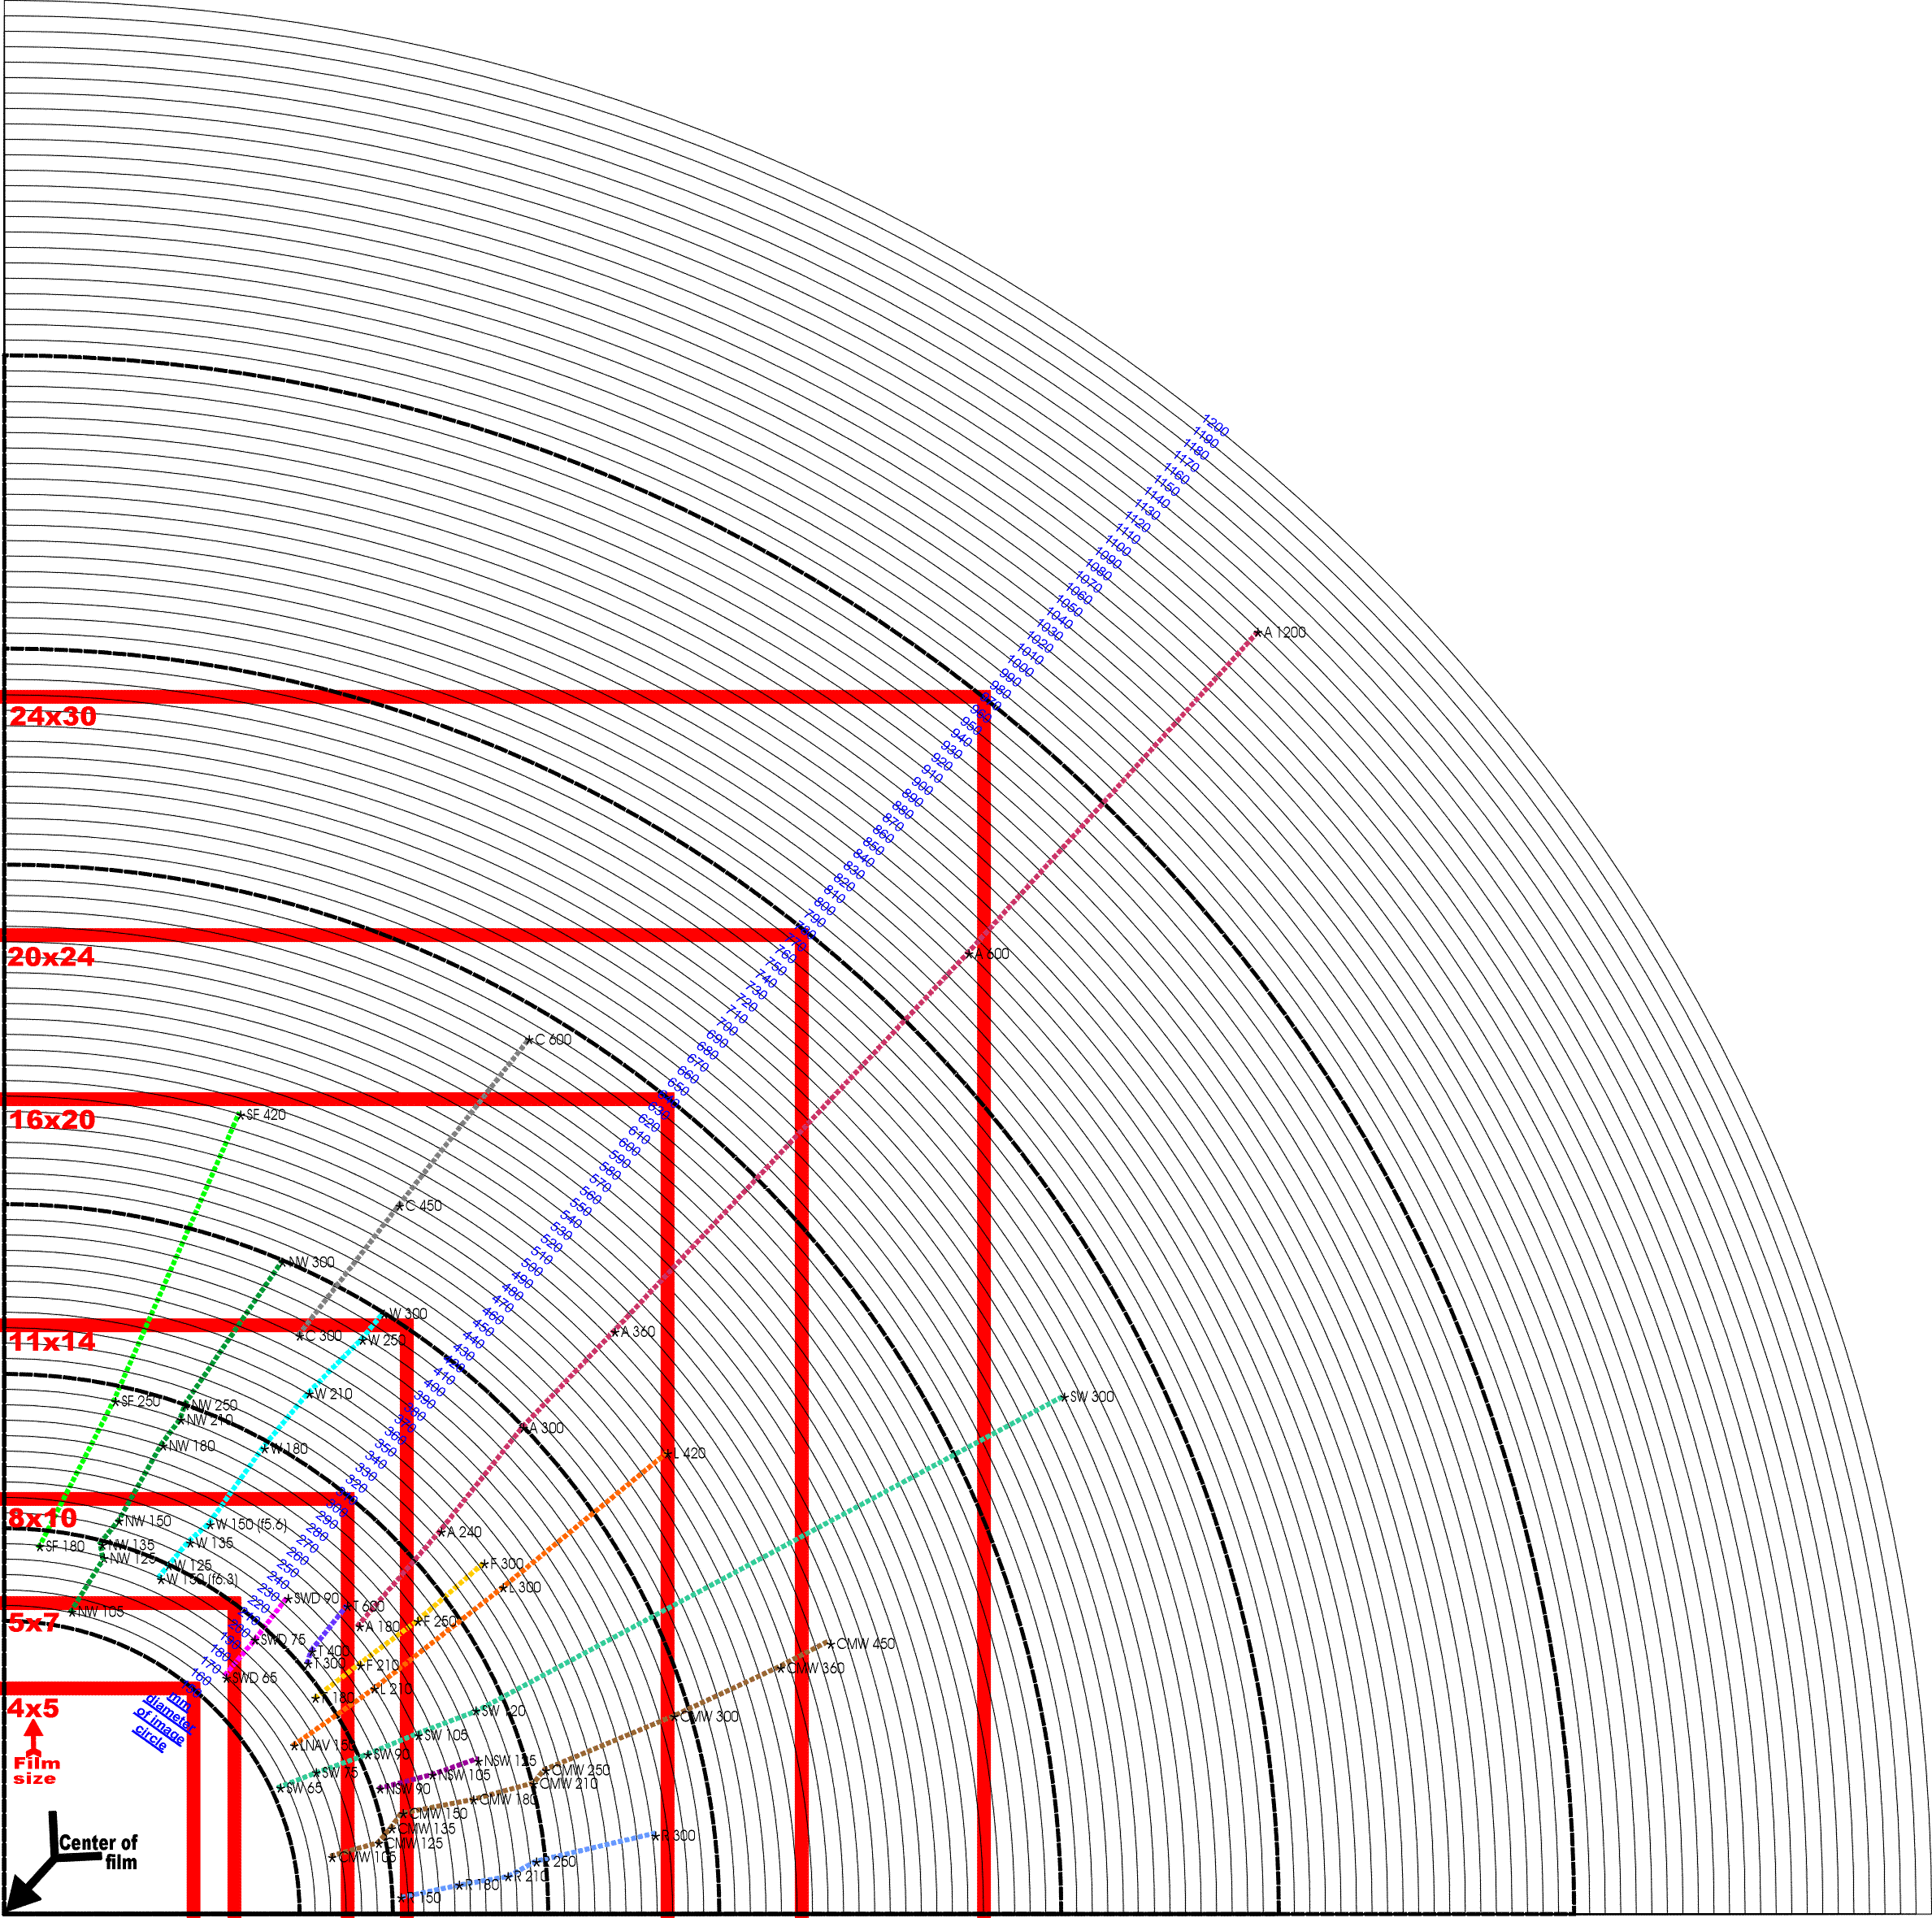
However, there is no free lunch! The image circle created by the lens will decrease when a close-up lens is added and the stronger the diopter, the smaller the image circle will become. And if the image circle shrinks enough, you are likely to lose the corners of the image. This is especially true if the lens -- without the close-up lens attached -- had a small image circle to begin with. Using the above set-up as an example, my CM-W 105mm will just barely cover the 4x5 format at infinity on its own. With the addition of a #4 close-up lens, the image circle is decreased enough to cut off the corners of the film. It's no big deal because with a little bit of cropping in the darkroom everything works out and I get the image I was hoping for. You can estimate the change in the image circle with this formula (yes, yet another formula to remember):
X = (Y / Z ) * W
Where:
W = the original (or starting) image circle in mm
Y = the new (or adjusted) focal length in mm
Z = the original (or starting) focal length in mm
X = the new (or adjusted) image circle in mm
Again, using the above set-up as an example, my CM-W 105mm which starts out with a 174mm image circle will have a 124mm image circle with a #4 close-up lens -- (75mm / 105mm) * 174mm = 124mm. Here is a GRAPH that will tell you if your new image circle will cover your film format completely.
![]()
And, you can do the exact same thing with enlarging lenses, too -- to make them a little shorter and wider in the darkroom. The main reason you would want to do this is to get a larger projected image on the baseboard or floor -- instead of having to resort to a horizontal position of the enlarger, which most enlargers don't allow. Here is a 135mm Fujinon EX f5.6 enlarging lens (designed for 4x5") with a No. 1 Minolta close-up lens (#2 diopter) creating a 105mm f5.6 4x5" enlarging lens with a wider view!

And you can do the same thing with movie or slide projector lenses when you want a larger image on the screen!
![]()